
Scripting the creation of SharePoint add-in packages is pretty straight forward. As I found there to be not very many posts on this topic, I thought I’d share how I implemented it.
To create and deploy is also easy from a developers box, all of this is achievable from inside Visual Studio.
The purpose of this post is to show how you would go about creating packages to be deployed on downstream environments.
I’m not going to go into the creation of certificates or the add-in client id. I’m going to take it for granted that if you’ve got to this stage, you already know how to do all of that.
Lets say you have a solution with one add-in and related web and you want to be able to script the creation of the packages to your UA environment.
Configure Add-In Profile
In Visual Studio, right click the add-in project and choose Publish. From the Publish your add-in page, choose New from the current profile drop down.
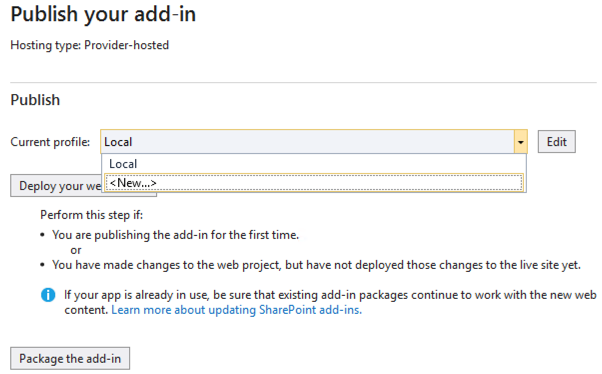
Populate the profile with the certificate details for the environment you’re wanting to package for and click Finish.

Configure Remote Web Profile
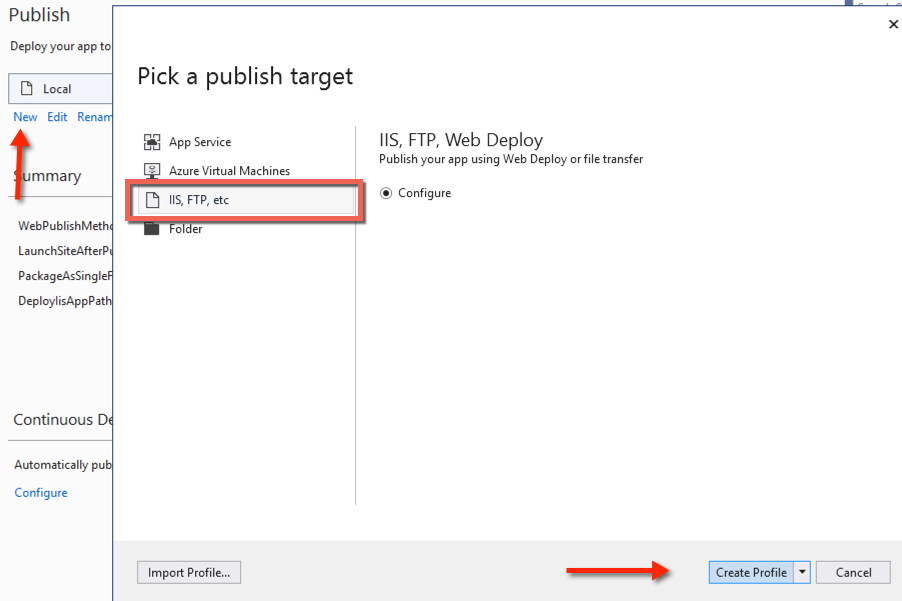
Next we need to configure the web part of the profile. Locate the web project for your add-in and right click it and once again then choose Publish.
At the top of the page that loads, click New to launch the Pick a publish target dialog. From there, select IIS, FTP, etc and then Create Profile.
Change the Publish method to Web Deploy Package, then set a package location and the target web application path.
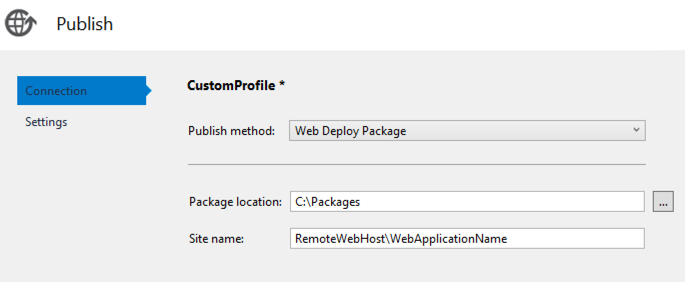
Click Next and choose the configuration profile for this build. Finally click save to complete the profile for this add-in and web.
In the Solution Explorer pane, expand the Properties\PublishProfiles folder within the web project. Here you’ll see the profile that you created above.
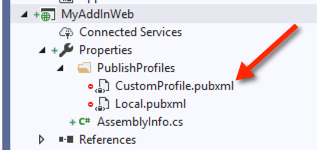
If you open this file, you’ll see all of the settings you entered for the add-in and web projects.
Scripting Package Creation
We’ll be using msbuild to script the creation of the packages for the add-in
#Change to thefolder that contains the add-in project file
cd "C:\location of the projects"

# Build and create the packages for the add-in and web
& "C:\path to msbuild\msbuild" /t:addinproject.csproj /p:IsPackaging=True /p:DeployOnBuild=false /property:Configuration=Release /p:PublishDir=C:\PublishFolder /p:ActivePublishProfile=CustomProfile
| Property | Description |
|---|---|
| IsPackaging | Set to True to create the packages after the build |
| DeployOnBuild | We don’t want to deploy anywhere during this process, so set this to False |
| Configuration | The solution configuration name |
| PublishDir | The location to publish the packages to. If you set this to C:\Packages\AddIn msbuild will create a folder called C:\Packages\AddIn1.0.0.0 Basically it appends the version of the add-in the this path |
| ActivePublishProfile | The name of the publishing profile that you created previously |
Once packing has completed, go to the folder you provided for PublishDir above. Here you should see 6 files:

If you open the SetParameters.xml file you’ll see all the settings for the profile you targeted in the packaging process. This will be used when deploying with the web.deploy.cmd batch file.
Deploy the Web Application
To deploy the web site you’ll need Web Deploy installed. The latest version for this can be downloaded from here, adding the location to the msdeploy.exe executable to the path environment variable.
To test run the deployment, similar to running a cmdlet with -whatif
MyAddIn.Web.Deploy.cmd /T
To perform the deployment:
MyAddIn.Web.Deploy.cmd /Y
There are also parameters here to specify the username and password, lots of info in the deploy-readme.txt file.