The object of this post is to provide a walkthrough on creating a custom workflow activity for SharePoint 2010 and deploying it as part of a custom sequential workflow.
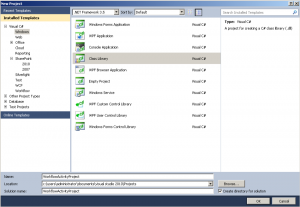
Start by creating a new empty Class Library project.
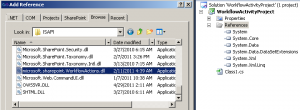
Once the project has been created, add a reference to the microsoft.sharepoint.WorkflowActions assembly.
The location of this assembly can be found in the ISAPI folder of the SharePoint hive. In case you’re not aware of where the hive is located, it can be found here:
[install drive]:\Program Files\Common Files\Microsoft Shared\Web Server Extensions\14
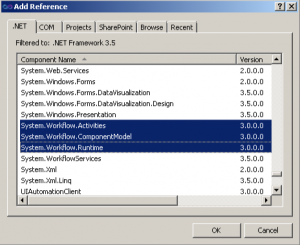
You should also add the following three references from the GAC.
- System.Workflow.Activities
- System.Workflow.ComponentModel
- System.Workflow.Runtime
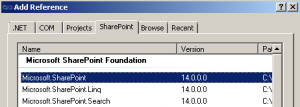
and of course, the Microsoft.SharePoint assembly.
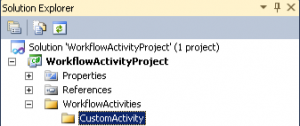
Delete the auto generated Class1.cs file and create a folder to create the custom activity code in. For example, WorkflowActivities\CustomActivity
Next, add a new Class item to the folder, calling it MyCustomActivity.
Add the following using directives to the new class:
- using System.ComponentModel;
- using System.Workflow.Activities;
- using System.Workflow.ComponentModel;
- using Microsoft.SharePoint;
- using Microsoft.SharePoint.Workflow;
- using Microsoft.SharePoint.WorkflowActions;
Now define your class as inheriting from the SequenceActivity class and add the ActivityToolboxDisplay class attribute.
[ActivityToolboxDisplay("Custom Activities", true)] public class MyCustomActivity : SequenceActivity { } |
The SequenceActivity class allows the inheriting class to implement a workflow activity that will run a set of child activities in a single defined order. There are many other classes that we could inherit from, depending on our activity requirements. For this example, the sequence activity suits. Other classes worth mentioning include:
- Activity
- Delay Activity
- Parallel Activity
- Replicator Activity
- Wait For Document Unlock Activity
The example workflow activity is going to perform a fairly simple task but the object of this exercise is to show you how to create a custom activity and incorporate it into one of your own workflows. All the activity is going to do is send a hard-coded email message to the email address passed into the workflow activity.
OK, back to the project.
We just added the ActivityToolboxDisplay class attribute, the purpose of this is to define the tab where the activity will appear in the toolbox for Visual Studio. Other attributes that you should look at adding include:
- ActivityValidator – Add code to validate the activity at both design and runtime
- ToolboxBitmap – Add a custom icon to your workflow activity
As our activity is going to be sending an email relating to the workflow’s document, we’ll need a way of telling the activity what its current context is. The way of doing this is with dependency properties.
A dependency property basically provides the plumbing for things like property resolution, data binding and change notification. One important thing to note here is that they behave completely differently to normal .NET properties in that they are not stored in an instance variable but instead use the dependency property framework to register themselves and are subsequently retrieved from this framework based on the rules defined by the property registration. They’re not the most elegant feature of WF (or WPF) but is something that you have to live with if you want to work with workflows.
The main feature that we’ll be concentrating here for dependency properties is activity binding. Basically, activity binding gives a dependency property an object to evaluate for the value requested. This can point to properties, fields or methods of activities inside a workflow. For example, one activity could bind its input to the output of a previous activity, this makes data flow a huge part of the workflow model.
For a basic workflow activity that will be interacting with the workflow instance, we need to define three dependency properties.
public static readonly DependencyProperty __ContextProperty = DependencyProperty.Register("__Context", typeof(WorkflowContext), typeof(MyCustomActivity)); public static readonly DependencyProperty __ListIdProperty = DependencyProperty.Register("__ListId", typeof(string), typeof(MyCustomActivity)); public static readonly DependencyProperty __ItemIdProperty = DependencyProperty.Register("__ItemId", typeof(SPItemKey), typeof(MyCustomActivity)); |
The three properties are __Context, __ListId and __ItemId.
When defining a property there are some simple rules that must be followed.
- The property must be declared as public so that all property system calls, including cross-assembly, can access it.
- It must also be static because this isn’t a definition that should ever change, i.e. the system expects to get consistent results
- It should also be marked as readonly, although it will work without this. It should be marked like this to stop code outside the registering class altering it.
- The name used when registering the property should have a corresponding public .NET property
The first property, __Context will correspond to the workflow context for the current instance.
__ListId as you might have guessed relates to the GUID, or name, of the list the activity belongs to.
Lastly, __ItemId relates to the identifier of the list item for the activity.
Following these rules, you can easily add your own custom dependency properties to the activity.
Now to add the related .NET properties for the three dependency properties.
[Browsable(true)] [DesignerSerializationVisibility(DesignerSerializationVisibility.Visible)] public WorkflowContext __Context { get { return (WorkflowContext)base.GetValue(__ContextProperty); } set { base.SetValue(__ContextProperty, value); } } [Browsable(true)] [DesignerSerializationVisibility(DesignerSerializationVisibility.Visible)] public string __ListId { get { return (string)base.GetValue(__ListIdProperty); } set { base.SetValue(__ListIdProperty, value); } } [Browsable(true)] [DesignerSerializationVisibility(DesignerSerializationVisibility.Visible)] public SPItemKey __ItemId { get { return (SPItemKey)base.GetValue(__ItemIdProperty); } set { base.SetValue(__ItemIdProperty, value); } } |
For these properties, the name relates to the registration name provided for the dependency property and the get\set accessors reference the dependency property instance.
As mentioned, the object of this activity is to send an email to an address passed into the activity. To do this we shall define our own dependency property and associated class property:
public static readonly DependencyProperty EmailToProperty = DependencyProperty.Register("EmailTo", typeof(string), typeof(MyCustomActivity)); [Browsable(true)] [DesignerSerializationVisibility(DesignerSerializationVisibility.Visible)] public string EmailTo { get { return (string)base.GetValue(EmailToProperty); } set { base.SetValue(EmailToProperty, value); } } |
For our activity class, which inherits from SequenceActivity, the main method we need to override is.
protected override ActivityExecutionStatus Execute(ActivityExecutionContext executionContext) { return base.Execute(executionContext); } |
This method will be fired when the activity is executing, as the name suggests.
If you need to initialise member values before this event, the best place would be to override the Initialize method.
The execute method for this example should look like:
protected override ActivityExecutionStatus Execute(ActivityExecutionContext executionContext) { // Deliberately no error checking\handling to keep method as simple as possible - not recommended! // Get the actual GUID object for the list Guid listGuid = Helper.GetListGuid(__Context, __ListId); // Get SPList item instance SPList listInstance = __Context.Web.Lists[listGuid]; // Get the SPItem instance for the workflow activity SPListItem itemInstance = __Context.GetListItem(listInstance, __ItemId); // Get the title of the item, which will be used in email body\subject. string itemTitle = itemInstance["Title"].ToString(); string subject = string.Format("'{0}' workflow message", itemTitle); string body = string.Format("A test email message for list item '{0}'", itemTitle); System.Collections.Specialized.StringDictionary headers = new System.Collections.Specialized.StringDictionary { {"subject", subject}, {"from", "webmaster@SharePoint.com"}, {"to", EmailTo} }; // Using the static SendEmail method to send our activity email. Microsoft.SharePoint.Utilities.SPUtility.SendEmail(__Context.Web, headers, body); return ActivityExecutionStatus.Closed; } |
This is a very simple method, with no error handling whatsoever and performs a very basic function – sending an email to the address passed into the activity. The activity will error if no address is provided or if a SMTP server hasn’t been defined for the farm.
The method demonstrates how you can reference the list and item associated with the workflow activity.
One final thing that you should do is to sign the assembly.
This concludes the first part of this post. The following post continues with this example and involves creating and deploying a workflow that uses the custom activity.

