
Following on from the post detailing setting up a development environment for provider-hosted add-ins, let’s move on and walk through creating an add-in.
Start by creating a new “SharePoint Add-In”. Then give the solution a name and choose a save location, like you would any other project. Next, select Provider-hosted (not SharePoint-hosted). Next choose how to host the solution, either Web Forms or MVC. For this, I’ll be using Web Forms. Lastly, select to “Use a certificate”, as this is an example of developing an on-premise provider-hosted add-in. You will have all the details required for this if you followed my post on registering a self-signed certificate.
Once the solution has been created, you’ll be presented with two projects. The add-in and the remote web project. The default settings for the web project is to use IIS Express for hosting when debugging, this is perfectly fine for that purpose and is good for situations where the add-in project will be changing as you develop. The reason for this is because every time you deploy, Visual Studio retracts, re-deploys and registers the add-in. Working this way makes it easy to make tweaks to the add-in definition without needing to perform updates to the existing add-in package or update sites that are using the add-in.
Once you’re finished with the add-in and are confident that additional modifications to it won’t be required, I’d recommend switching the configuration of the web project as follows:
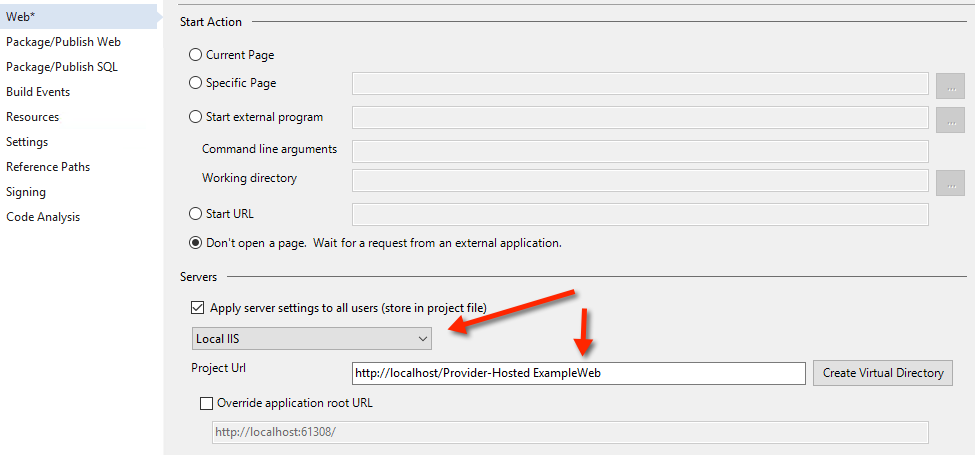
In IIS, create a new website for hosting your add-ins. Then add a new Application and point the path for this to the web project’s source. For example, I created my solution in C:\Source\Provider-Hosted Example, which created two sub folders, one for the add-in and one for the web. I’d point the new Application to the root of the web’s folder. Lastly, I also grant read access to this folder for the application pool of the web site. A more detailed explanation of all this can be found in this post.
Lastly, change the Web settings to use the web application you’ve just set up, instead of IIS Express:
With this in place, all you need to do is make the desired code changes to the web project and the add-in will automatically start using the new code. For this to work, you’ll also need to upload the add-in to your catalog site, register it and set the add-in settings within the web.config. I’ll show you how to do this later but first we need to create our sample add-in.
Developing the Add-In
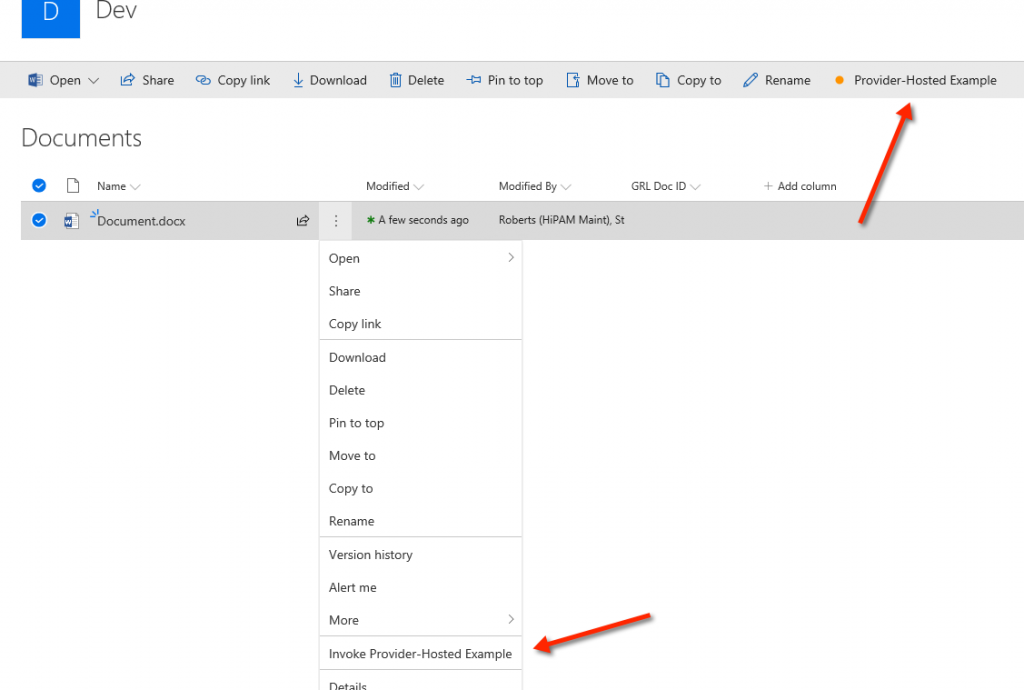
For this walk through, I’ll add a custom menu to the toolbar and item context menu. The page it navigates to will be hosted in the remote web and from there the code can read details about the item or library that invoked the action.
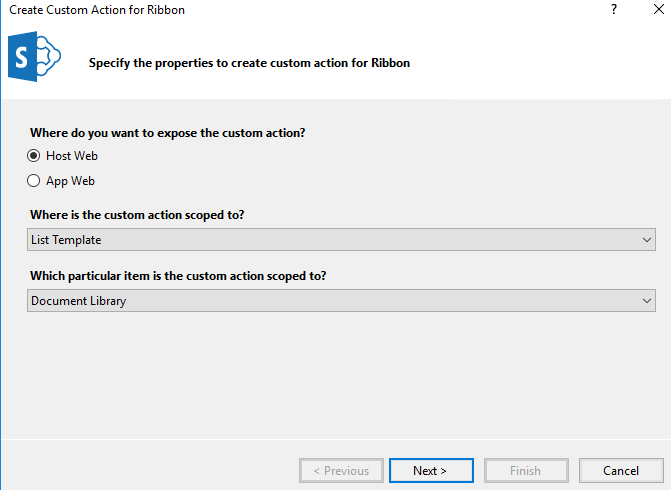
Within the add-in project, add a new item. Selecting “Ribbon Custom Action”. As we want this menu to be shown on the actual web the add-in is activated on, select to expose the action on the Host Web. If you choose App Web, it’ll only register in the hidden web for the add-in. Scope it to a list template and document library:
Personally, I skip the next stage of the wizard and edit the xml for the action directly. The ribbon button definition is identical in structure to how you would have done this for an on-premise solution. I won’t go into any detail of this as I’m assuming you already understand this. One thing that is important is to ensure the command action points to the correct page in your web project.
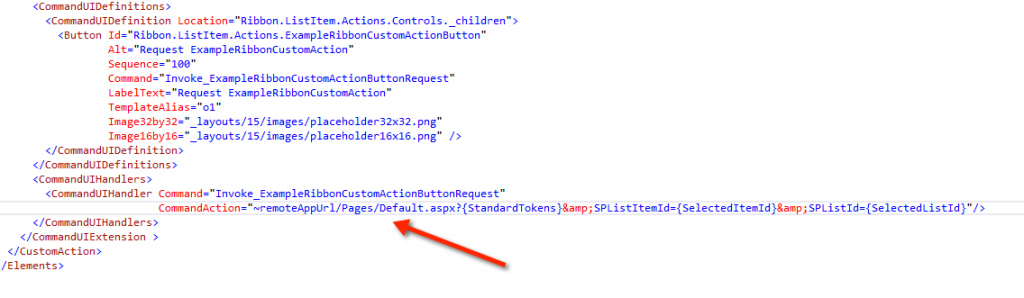
˜remoteAppUrl will be resolved to the URL for the add-in’s remote web as the add-in is activated on a site.
Adding a context menu for an item is very similar. This time you need to add a “Menu Item Custom Action” to your add-in project and follow the same steps as before. As before, the xml for this is the same as on-premise solutions when adding an item to the ECB.
Now lets add some code to the remote web’s page that’s being targeted by both the custom menus.
Go to the code behind for the page you want to be called. I added a new Web Form item to the project and updated the menus to point to it. Go to the code behind for the page. Here, you need to use CSOM to interact with SharePoint.
protected void Page_Load(object sender, EventArgs e)
{
  spContext = SharePointContextProvider.Current.GetSharePointContext(Context);

  using (var clientContext = spContext.CreateUserClientContextForSPHost())
  {
    clientContext.Load(clientContext.Web);
    var lists = clientContext.Web.Lists;

    var listId = new Guid(Request.QueryString["SPListId"]);
    clientContext.Load(lists).Where(l => l.Id == listId);
    clientContext.ExecuteQuery();

    var list = lists.FirstOrDefault();

    // Do something with the list
    //
  }
}
The about finishes the development of our basic example add-in. You may want to add code to the Pages/Default.aspx. This is what will be called when the add-in is clicked by a user on a site. For this example add-in, I simply redirect them back to where they came from.
protected void Page_Load(object sender, EventArgs e)
{
  spContext = SharePointContextProvider.Current.GetSharePointContext(Context);

  Response.Redirect(spContext.SPHostUrl.OriginalString, true);
}
Configure the add-in
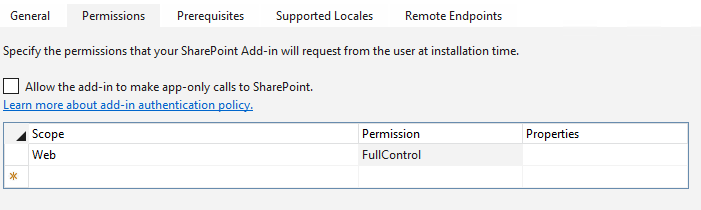
We now need to define the permissions for the add-in. To do this double click (or select View Designer in the context menu for it) the AppManifest.xml file within the add-in project. Switch to the Permissions tab and add the desired permissions. For this example we need full control on the web hosting the add-in.
Configure the Remote Web
Now to configuring the web project. Edit the web.config and ensure the application settings match your self-signed certificate.
<appSettings>
  <add key="ClientId" value="" />
  <add key="ClientSigningCertificatePath" value="C:\Certs\TrustCert.pfx" />
  <add key="ClientSigningCertificatePassword" value="password" />
  <add key="IssuerId" value="11111111-1111-1111-1111-111111111111" />
</appSettings>
Leave ClientId empty until you’re finished making changes to the add-in and want to switch away from using IIS Express. When this is the case, generate a Client Id. This is basically any lowercase Guid. It’s important that it’s in lowercase. There’s no need to set a client secret as this is only required for SharePoint-hosted add-ins.
The following post details how to setup different profiles within Visual Studio and configure the web’s config settings per environment. With this, you can have a profile for your dev machine, UA, production, etc. all with their own certificates.
Testing The Add-In
With the web setup to use IIS Express, click Start within In Visual Studio to deploy to your development site.
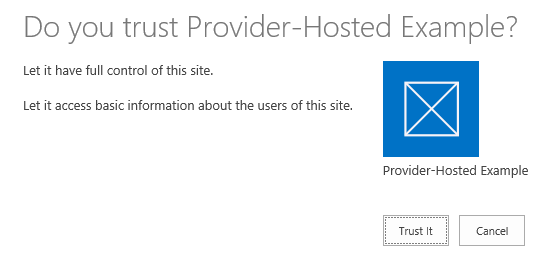
Click Trust It to complete the installation and activation on your developer site.
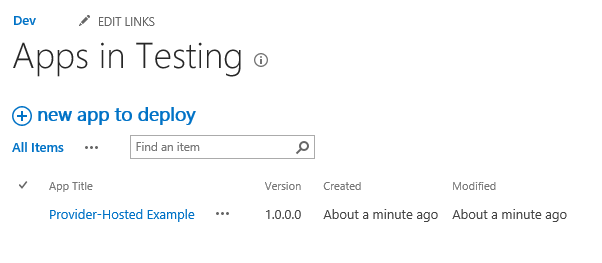
All going well, you’ll be re-directed back to the homepage, if you added the code above to your pages/default page. Now verify the add-in is in the Apps in Testing library:
I configured my menus to use the Document content type, so any library using this will show the menu.
As mentioned before, when the add-in is complete and only the web code will be updated, I find it easier to stop using IIS Express, the development site and running directly from Visual Studio. I make the switch at the beginning of this post to use IIS and point at the relevant IIS web application. I then register the add-in with the catalogs site. You do this by navigating to ˜/catalogsite/_layouts/15/appregnew.aspx
Setting up a development environment describes how to use an add-in domain via the hosts file. Alternatively you can use your own certificates and SSL, whichever is easier for you.
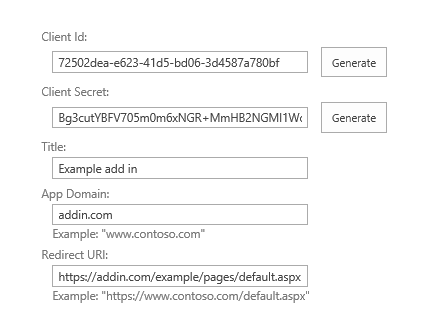
Copy the Client Id and update the web.config to match. You can ignore the Client Secret, it’s only required for SharePoint-hosted add-ins.
Publish the add-in by right clicking the project and choosing Publish. For “Current profile”, create a new entry and call it whatever you like. Populate the profile screen with the same Client ID and your certificate details.
Now click Package the add-in and ensure the URL and Client ID boxes match what was used in the add-in registration page from above. Once packaged, it will appear in the bin\debug folder of the add-in by default. Upload this to your catalogs site, within the Apps for SharePoint library.

Now if you go to a site and click add new app, you’ll see the add-in is now available for you.
Now any changes you make to the web code , will automatically take effect within the add-in. To debug, simply attach your debugger to the w3wp process for the web hosting the add-in.
For more details on deploying and configuring profiles, follow this guide.